


Warning! Actions described below can brick your headset! I’m sharing my experience only, and don’t recommend to repeat that. Any damage caused to your data or property is on your own risk.
If warning doesn’t stop you, and you still want to repeat my experience, I’d recommend to treat as you already have bricked headset. You have no headphones anymore. You are lucky if they are recovered. And you are very lucky if audio-lag issue is resolved in the end. But only if you are lucky. You have no headset. Accept that 🙂
Problem description. Early revisions of Bluedio T4 headset (produced till mid of June 2017) have audio desynchronization issue when connected over Bluetooth. There is an audio lag up to one second. It’s not possible to configure player with artificial audio delay, as the audio lag is not stable – it floats from 0 to 1000ms. If I got it right, the delay depends on audio stream parameters. It always starts synchronously, but lag is accumulating over the time. As a side-effect, you may notice while listening music – once one sets on pause, the sound keeps going in headphones for another second. The problem existed when connected to all my devices.
(I had one exception with one computer of mine – probably caused by usage of some specific Bluetooth profile, or driver: there takes place some correction of synchronization. It happens once a second. During this correction the sound is interrupted and video is skipped for some frames. As result it was painful to watch videos on this computer at all.)
There is no issue when connected over cable. But that’s understandable – when connected like that, sound goes directly to phones, skipping processor (neither volume is controllable, nor ANC works).
If you can’t deal with watching videos via cable connection, and have no fear to brick your headset (see warning above), and you have a soldering iron with thin tip, and some experience – you might consider to fix the issue.
The issue doesn’t disappear completely! But the lag gets reduced to acceptable level. As an example, here are two video samples captured before and after flashing.
1. Before flashing
2. After flashing
(Unfortunately the computer with sound-hicks keeps hicking. But interval between hicks significantly increased – now it get’s interrupted once in 15 seconds (sometimes longer), and interruptes are not so noticeable as before (though on some videos there are no issues at all).
Anyway, be aware – the issue isn’t gone completely, but became at least acceptable.
Upd. After I’ve changed bluetooth drivers on hicking PC – the problem has gone completely.
In the beginning I need to clarify – the production line flashing tool was used. From the Chinese production line. With Chinese user interface. It’s hard to understand which setting is for. More over – I wasn’t able to get confirmation of successful flashing, as all operations were either failing on test cycle, or falling into endless loop on verification step. But in the end my MAC address has been updated, and lag disappear. Therefore I tend to believe the flashing was successful 🙂
To understand how the flashing tool works I had to use serial port monitor, plus arduino-compatible SoC for headset emulation (I was using NodeMCU ESP 12E).
The UI of the tool has been partially translated – with only purpose is to ease references to UI elements in this instruction.
Bill of materials:
1. Soldering iron with thin tip
2. Any module for 232 serial port emulation over USB (or any other possibility to connect to headset’s board via COM-port). I was using PL2303, FTDI, and CH341A. The last one was used on final flashing procedure. The main requirement – the COM port should support connection on 921600 baud.
3. Windows PC (real, or emulated – doesn’t matter. But should get access to the COM port)
4. Screwdrivers, wires, etc. If you have first two items from the list, I’m pretty sure you have the rest 🙂
Here we go.
-1. Write down old MAC address. The only purpose – is to verify result. It’s also possible to flash original address, but I don’t really see any reason to do so. I was using this app.
0. Full charge battery.
1. Disassemble right earphone. I’d recommend to use a rubber sucker to not scratch plastic surface. The cap is held by three clips. That’s probably most critical HW part – I was disassembling headphones three times, and every time was not sure if I can break some clip. The most interesting stuff (PCB, battery) are in the right phone.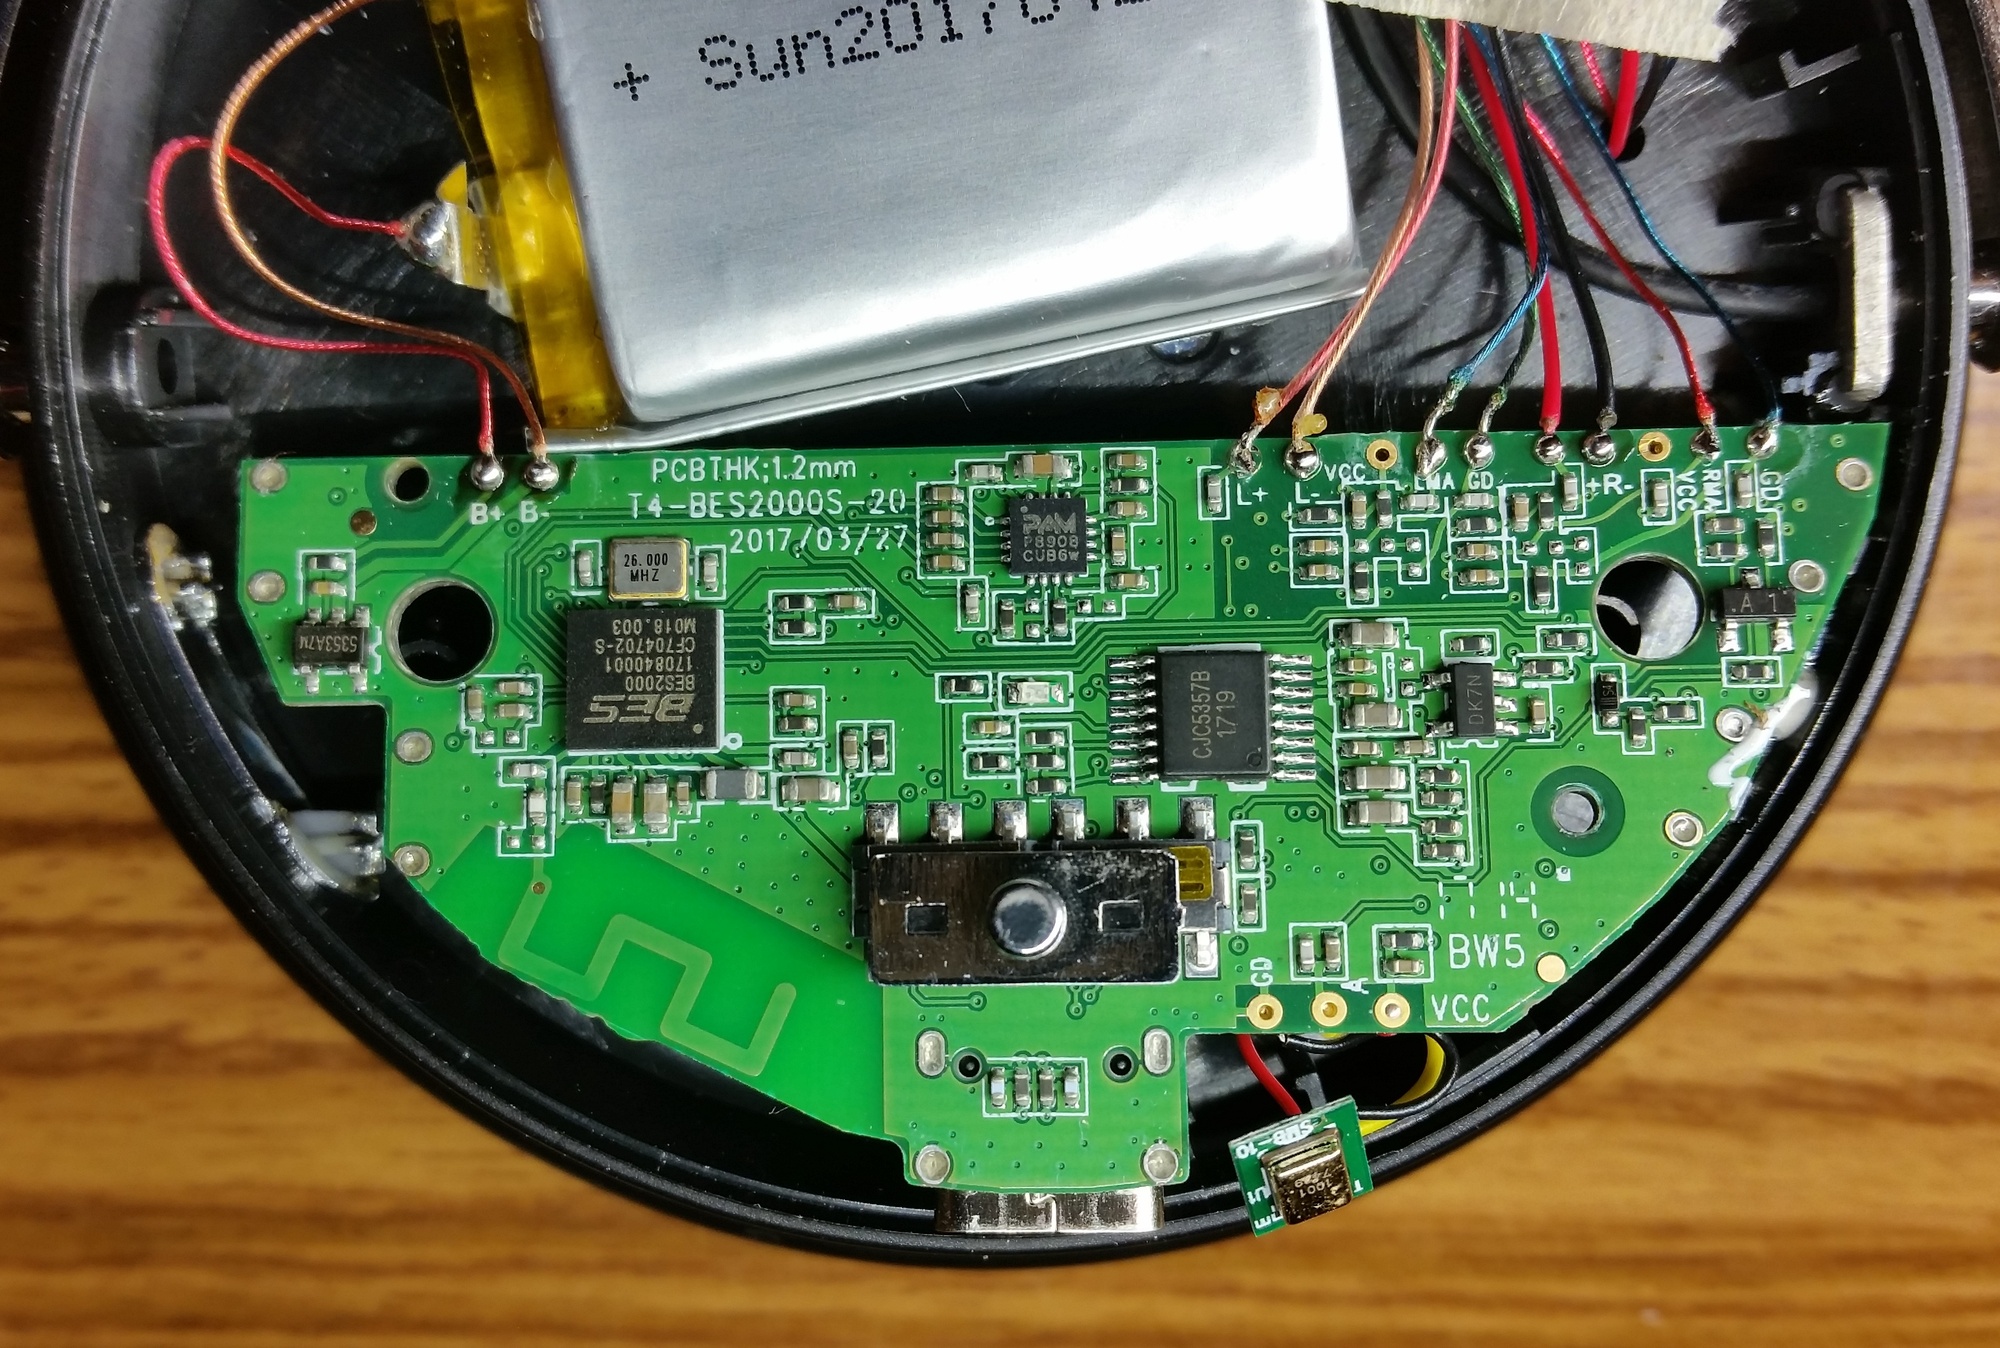
If you are curious, here is the left one – just to prevent you from unreasonable risk.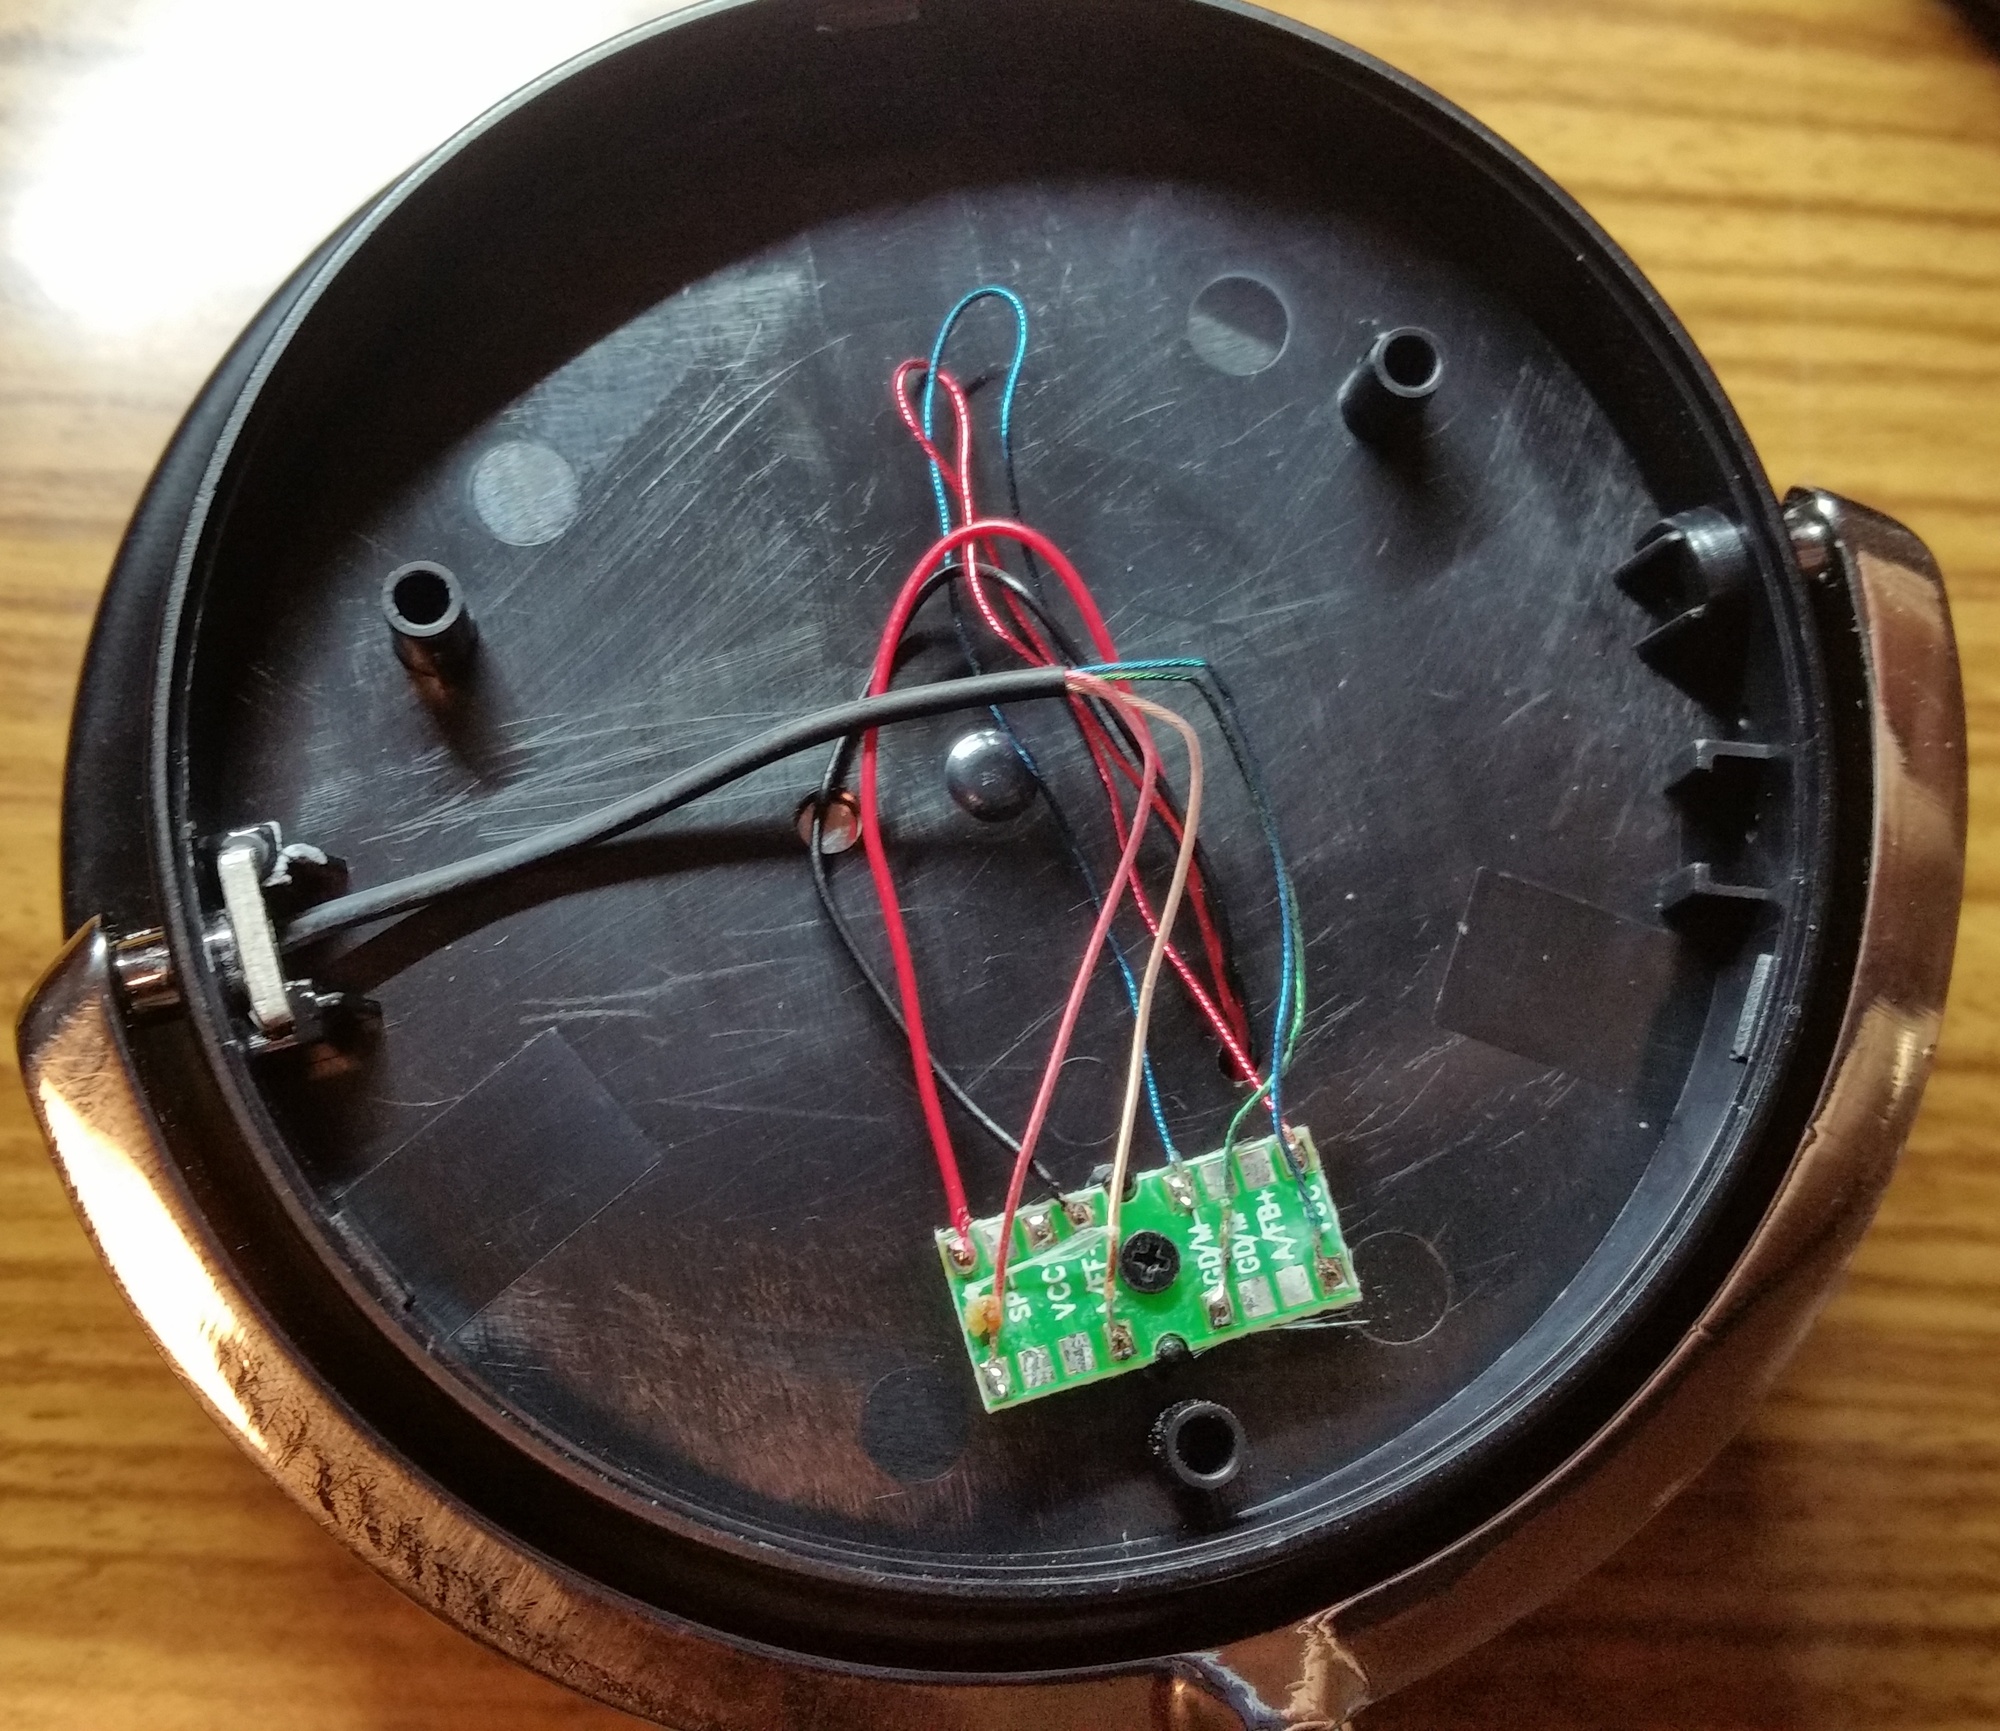
There are some service-points on the down side of board. Apparently they are used on service line – there are signs of connections.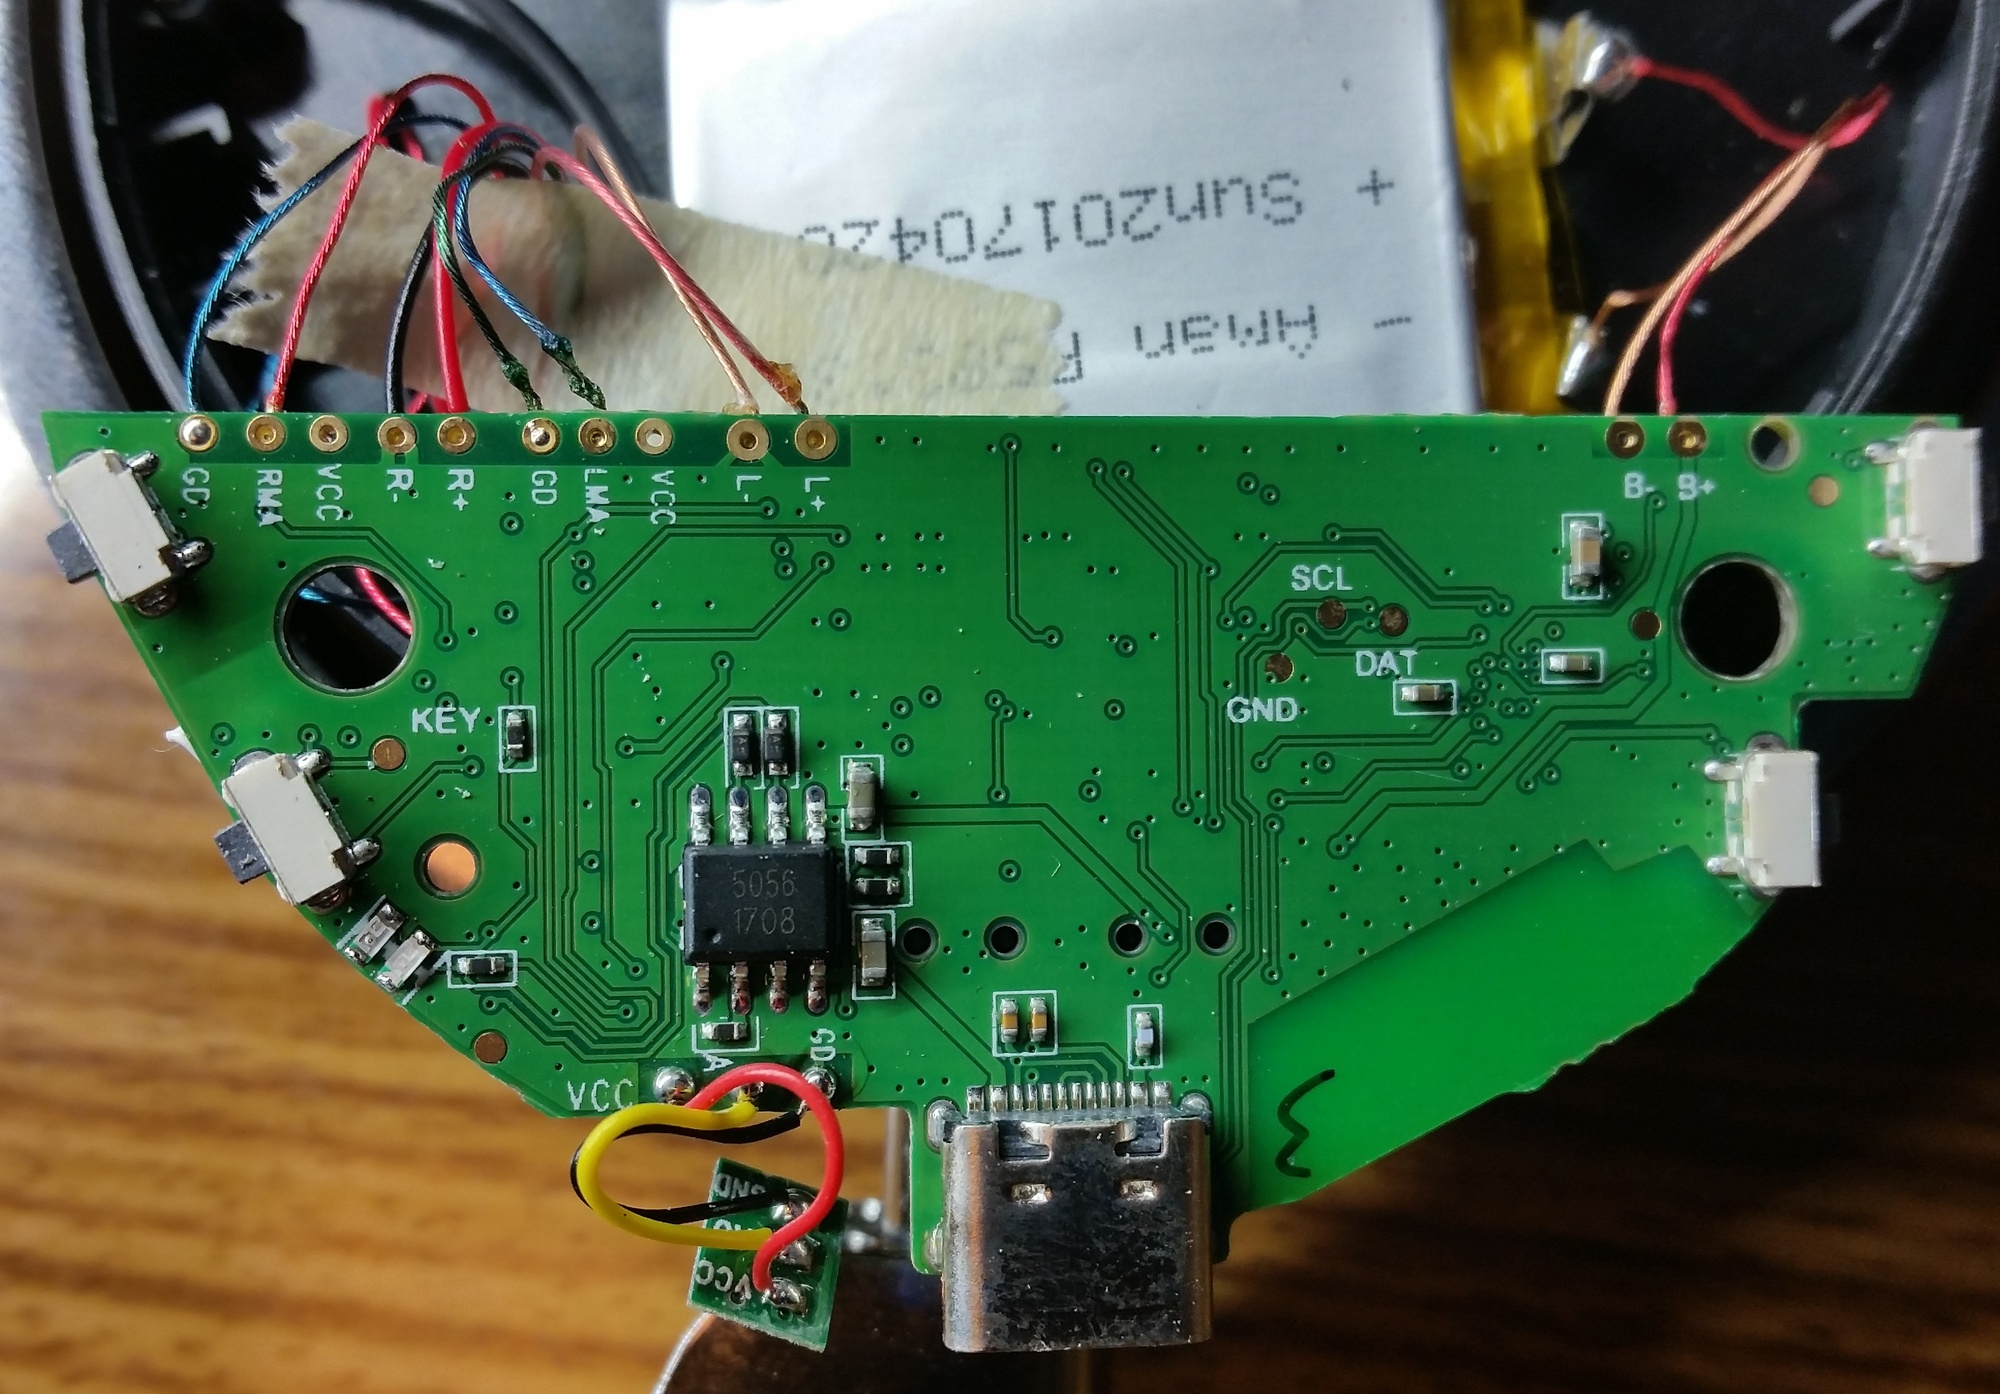
Probably it’s necessary to use all of them for full production line support. But for us it’s enough to use only three of them.
2. Solder connectors to points marked with SCL, DAT, GND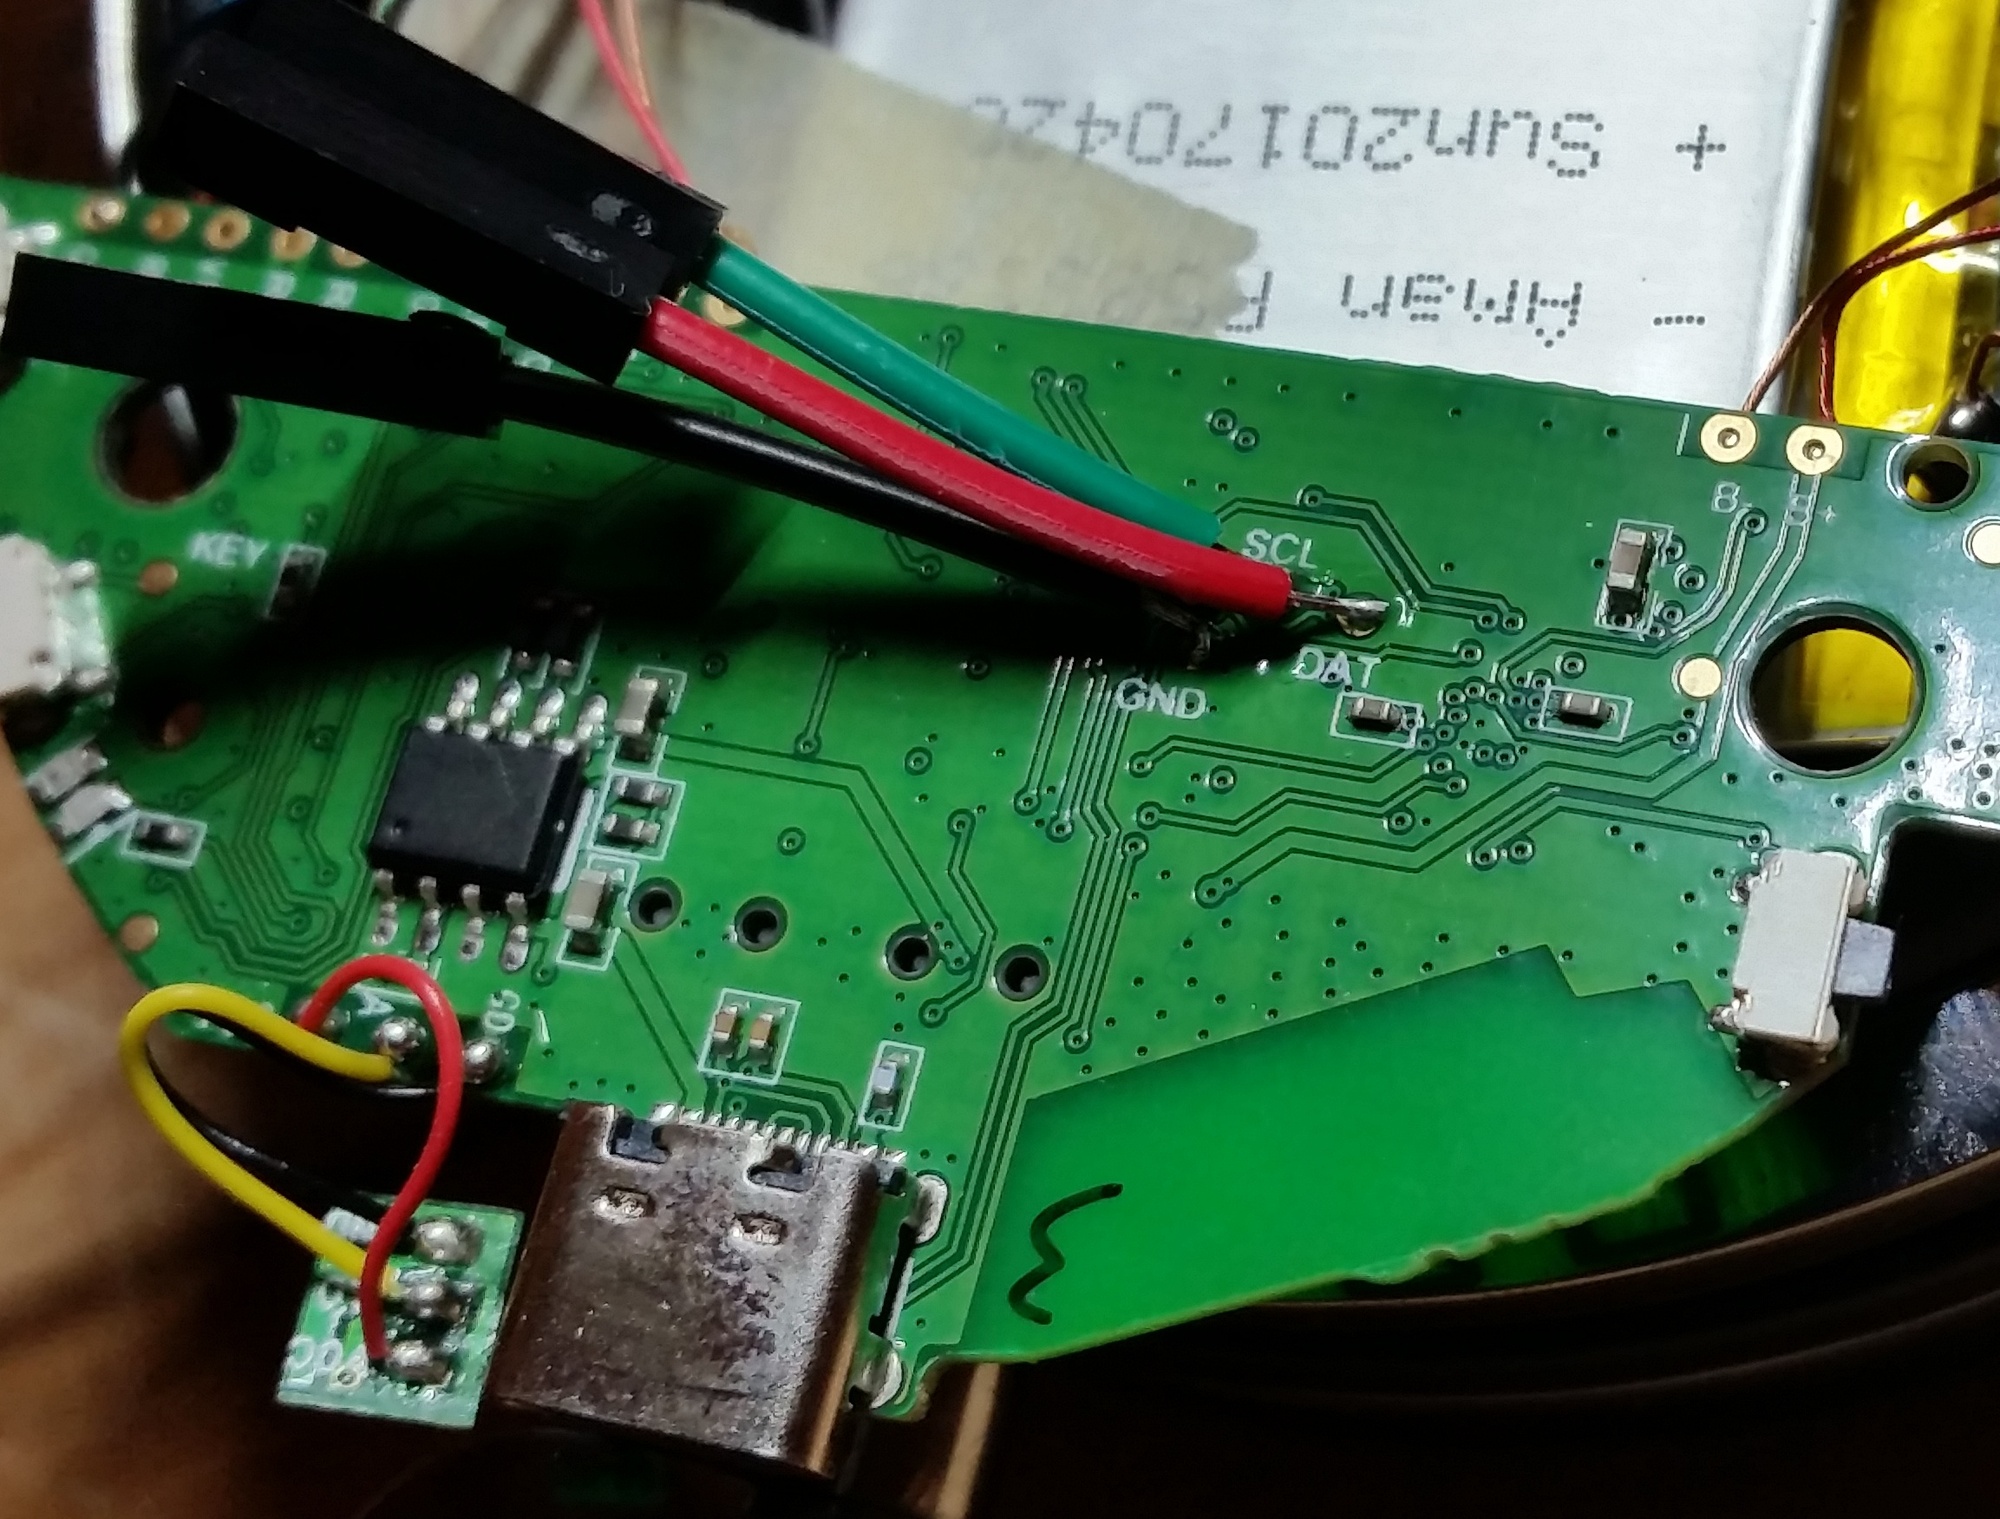
3. Connect to the 232 interface like follows:
RX → DAT
TX → SCL
GND → GND

(I believe it’s clear that you may use no dupont-connectors like I did, by simply soldering wires directly, or don’t solder at all. But… you know… )
4. Plug USB module into PC, install drivers, start the flashing tool.
5. First execution is probably may be omitted, but helps to understand if everything works as expected:
5.1. Select COM port, disable others. (Port settings → Scan Ports → COMx → OK)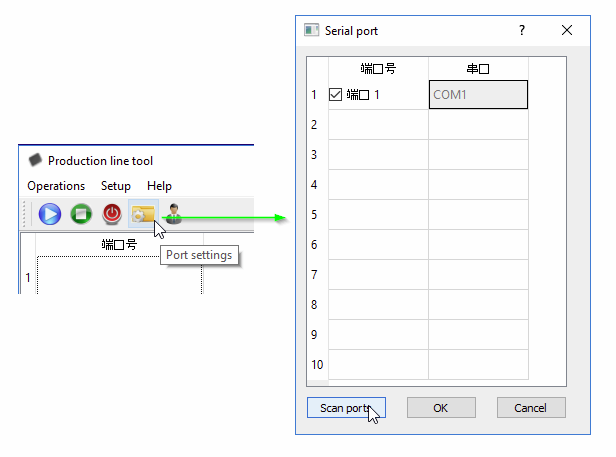
5.2. Open settings. (Firmware Configuration → usr/pwd: lyfoes.com/lyfoes.com)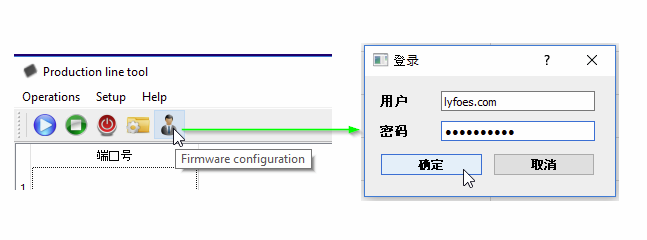
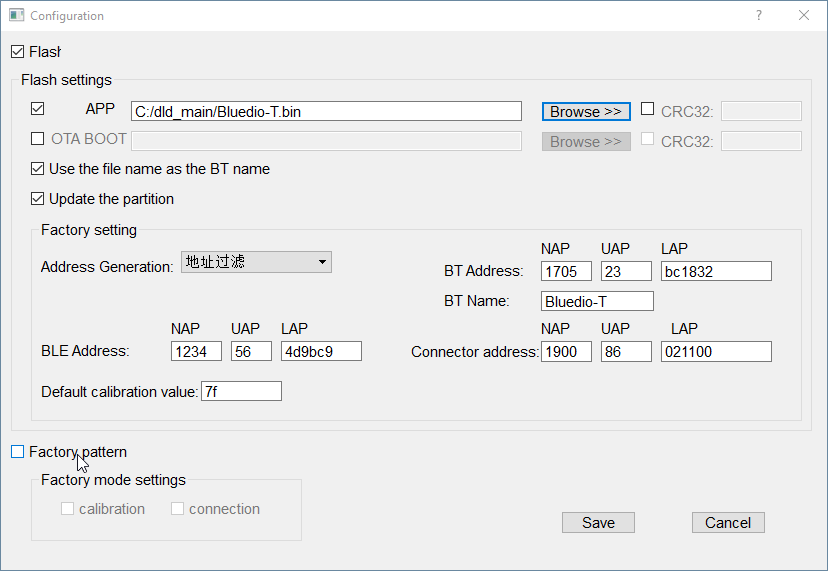
5.3. If required, fix the path to the firmware image, and correct other settings based on following picture.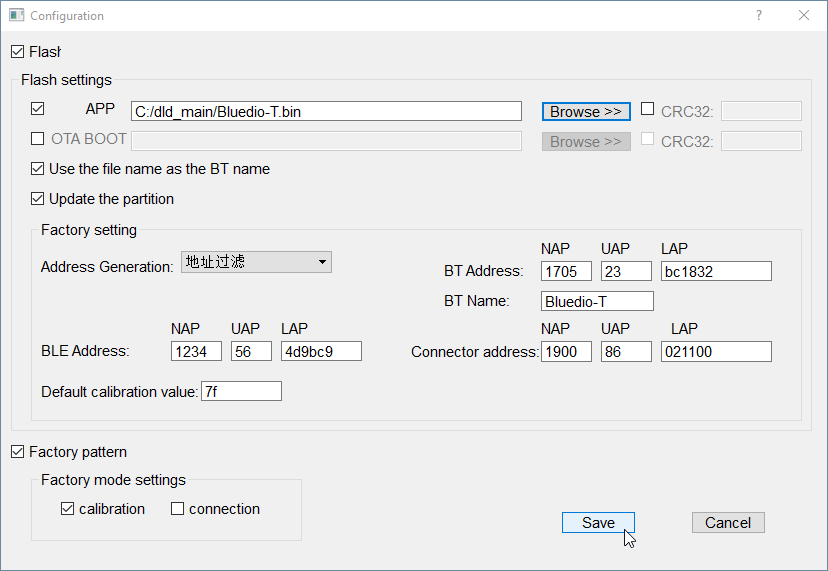
The BT Address NAP/UAP/LAP parameters are responsible for the new MAC address. When it’s really required, you may enter the original address and try to find out which pattern generator is to be used to avoid ‘correction’ of the entered values 🙂 I entered original one and used the pattern like on screenshot, but in the end it was automatically modified in the third byte.
5.4. Save settings, and press the ‘Start’ button on the main screen (blue circle with triangle). The tool opens then the COM port in 921600 8N1 mode and waits for handshake initiated by headset (it doesn’t write anything to the port unless receives first packet starting with 0xBE500003).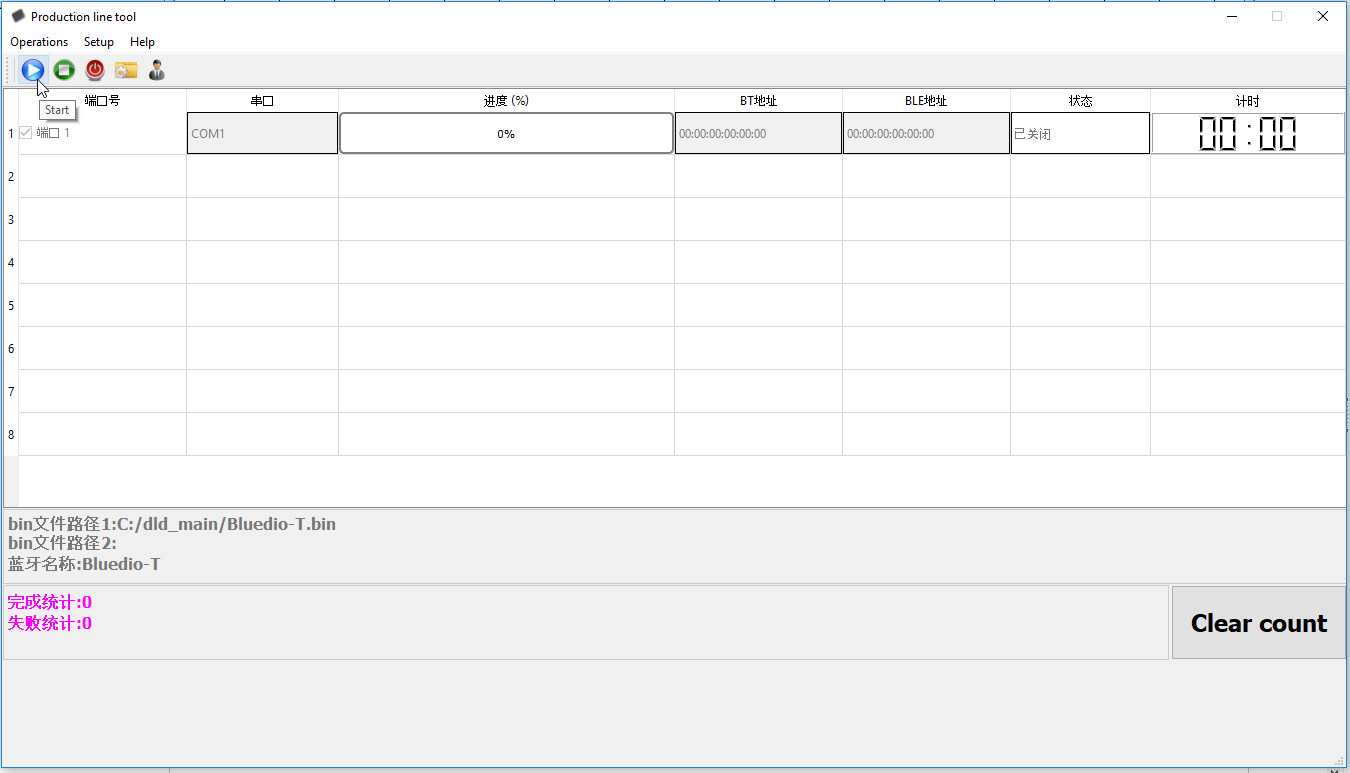
5.5. Press the power button on headset. If everything is connected right, drivers are in order, the correct port is selected – the progress should start. The headset blinks with red-blue LEDs. The first cycle (obviously emulation) runs for dozen seconds, then second cycle starts, goes until 20% and fails with error message. The headset remains with red LED on. Wait until red LED turned off and headset is ready for another connection attempt (around couple minutes).
6. The flashing.
6.1. Open settings and uncheck checkboxes “calibration” and “Factory pattern”.
6.2. Repeat previous step: start flashing, press power button. First cycle goes around 13 seconds. On second something weird has happened on mine – the tool changed status to “verification” and didn’t update any progress anymore. The headset also didn’t demonstrate any activity. But there was some data transmission visible in the serial monitor (though transferring data didn’t look like a part of firmware – there rather were some repeatable patterns). To be sure, I did wait for over than half of an hour. Afterwards I simply disconnected headset. And it was a panic moment – it didn’t react anymore, like it was bricked. After some experiments, it awake when I connected a charger on its USB port. Once checked, found updated MAC address, and no audio lag anymore.
I do suspect that after first cycle has ended, the headset enabled some keep-alive mode, and was waiting for some command by power button, or some other condition had to fulfill. Unfortunately I didn’t came to idea to check all possible variants – it was a deep night, I was falling asleep 🙂
Short video with demonstration of procedure:
But my initial idea was to replace the ‘blackbox’-tool with own flasher (taking into account I have the whole communication protocol). But lack of free time drives all the investigations to never-ending project. Did repair own headset – is enough to stop. Just sharing what I have at the moment. Nerveless there is a place for further investigations, if somebody would like to…
TODO, when get bored, get some free time, and wish:
– get some final firmware with all bugfixes, when it’s released (need to get in touch with Bluedio’s engineers, steal, beg, or give myself away in the end 🙂 again :-).
As an option – find out how to download a firmware from headset, get some final revision of headset (when it’s on market). (there is released some T4S model — check if there any hardware improvements, or software only)
– I don’t really like default sounds (“power off”, “device connected”, etc). Would like to replace them with short beeps.
– The ultimate plan — get the firmware sources. And then aptX and who knows what else… 🙂
– Or forget about, and use what I have now, while it works. In the end to buy something else 🙂
If somebody would move further in investigations – please share the info (here, or via email: anar@ibn.by).
Oh, yes. Almost forgot. Link to the flashing-tool archive.
password: lyfoes.com


Hi Anar,
I just followed your steps and was able to flash my Bluedio 4T successfully. Now I got nearly zero audio lagging thanks to you.
Then I tries to flash one of my friend’s Headset and stuck on middle of the first round and had to stop it. Then I can not enter to the flash mode. Seems like power button is not working. I removed the all the wiring, and connected to the USB power cable and tried to switch on. But it didn’t work either.
Do you have any idea about this situation. I can not figure out a way to enter to the flash mode.
Thanks
Hi Charitha,
Sorry for delay – just noticed your comment was filtered out to spam.
As for issue – unfortunately I don’t know what could go wrong here. Does headset work yet? Or it can’t be turned on at all, or it’s kinda bricked now?